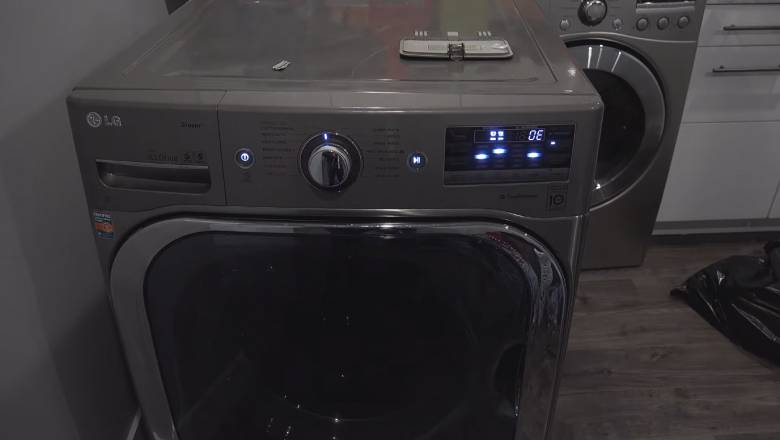
LG Washer OE Error Code — Causes and Step-by-Step Fix

The OE error code on an LG washing machine means the unit cannot drain water from the drum within the expected timeframe (typically 5–8 minutes). According to LG's official support documentation, this is a drain path obstruction — most commonly caused by a clogged drain pump filter, a kinked drain hose, or a blocked standpipe. Approximately 80% of OE errors are resolved with a simple filter cleaning that takes under 15 minutes and costs nothing.
The LG washer OE error code means the washing machine started a drain cycle but failed to empty the tub within the allowed time window. When the control board's pressure sensor detects that water remains in the drum after 5 to 8 minutes of pumping, it halts the cycle and displays OE on the control panel to prevent overflow or pump damage.
DIY fix success rate: approximately 80% of OE errors resolved without a technician. Average repair time: 10–20 minutes for filter cleaning. Drain pump replacement cost: $30–$120 for the part (OEM). Professional repair cost: $150–$350 including diagnostics.
The good news is that OE is overwhelmingly caused by a physical blockage rather than an electrical or mechanical failure. This guide covers every cause from the simplest (a clogged lint filter you can clean in 5 minutes) to the most complex (a failed drain pump motor), with specific LG part numbers and cost estimates at each step so you know exactly what you're dealing with.
What Does the OE Error Code Mean on an LG Washer?
OE stands for "Outlet Error" — a designation LG uses to indicate that water cannot exit the machine through the drain path. The error appears on both front-load and top-load LG washers when the washer's internal pressure switch detects that the drum water level has not decreased sufficiently after the drain pump has been running for the allotted time.
On older LG models (pre-2017), this same error may appear as E03 or E21 instead of OE. The meaning and fixes are identical regardless of which code your display shows.
This error is distinct from other LG drain-related codes:
- OE — Cannot drain water out (outflow problem)
- IE — Cannot fill with water (inflow problem, the opposite issue)
- LE — Locked motor error (motor overload, not a drain issue)
- Sud/Sd — Excessive suds detected (foam blocking drain, may accompany OE)
If you see OE specifically, the problem is always in the drain path — water trying to leave the machine, not enter it. The washer stops mid-cycle as a safety measure with clothes still soaking in water, so the first priority is getting that water out before diagnosing the root cause.
Common Causes of the LG Washer OE Error
Based on service data and LG's own troubleshooting documentation, here are the causes ranked by frequency:
1. Clogged drain pump filter (approximately 50% of cases)
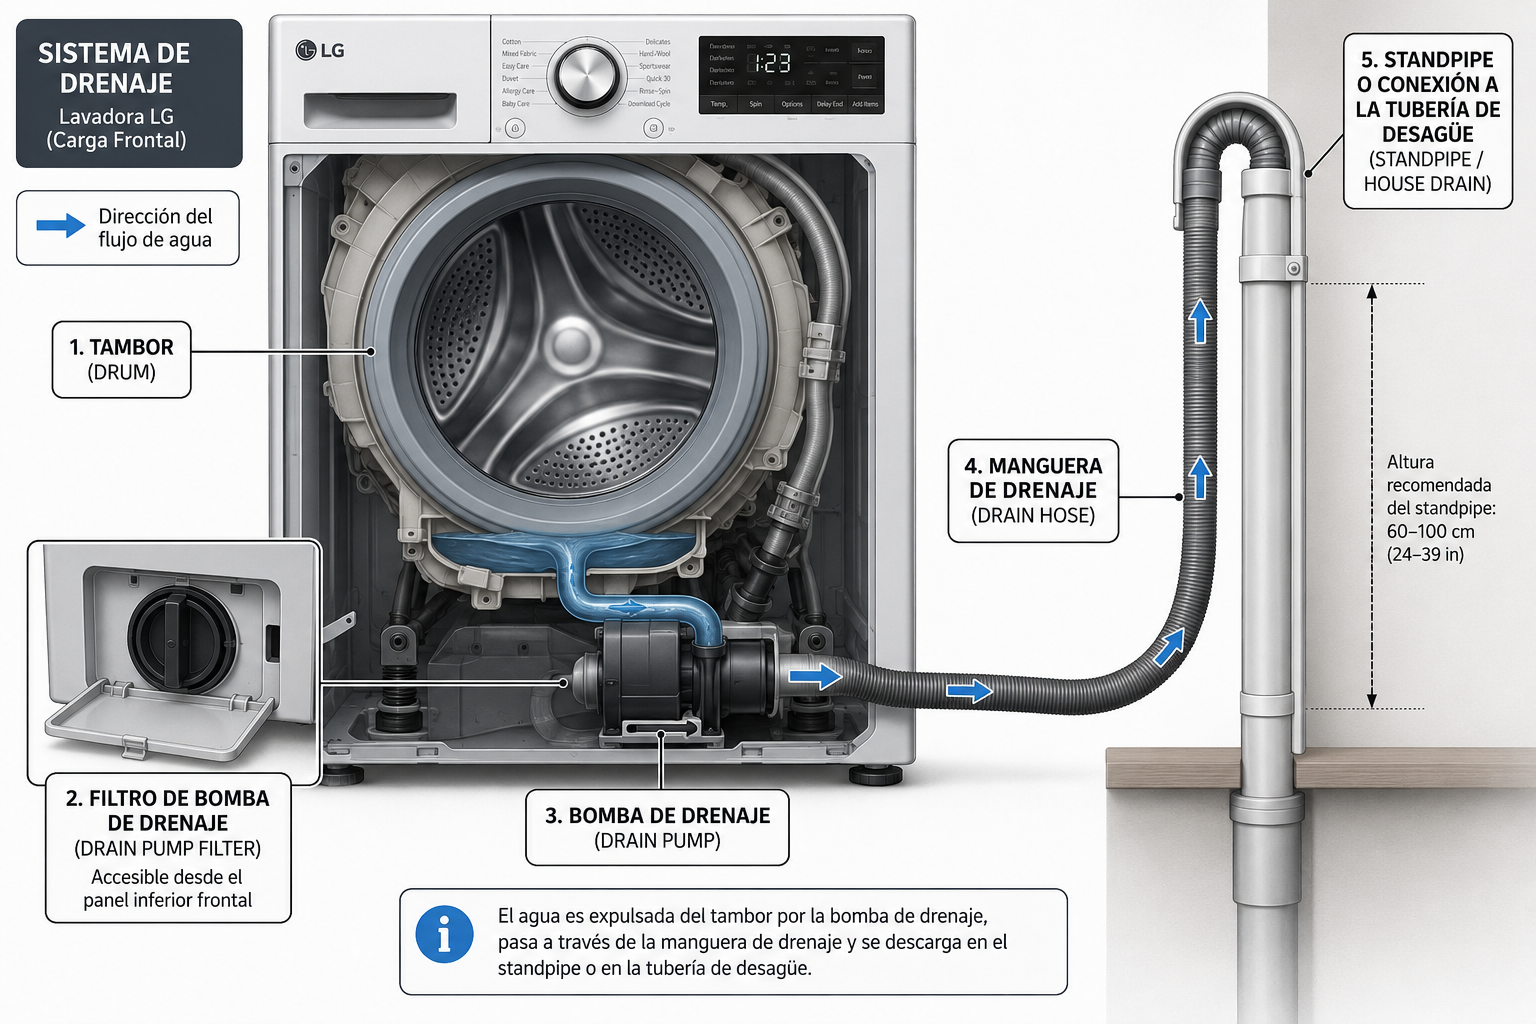
Every LG front-load washer has a debris filter located behind a small access panel at the bottom front of the machine. This filter traps coins, hair ties, buttons, lint, and small items that escape pockets during washing. When the filter becomes saturated, water cannot flow through to the drain pump at sufficient volume. This is the single most common cause and the easiest to fix — LG designed the filter to be user-serviceable without tools.
2. Kinked or clogged drain hose (approximately 20% of cases)
The corrugated drain hose running from the back of the washer to your home's standpipe or utility sink can become kinked when the machine is pushed back after installation. It can also accumulate soap residue, lint, and debris internally over time, gradually narrowing the flow path until the pump can no longer evacuate water fast enough.
3. Standpipe or home plumbing blockage (approximately 12% of cases)
The standpipe where the drain hose connects to your home's plumbing can become clogged with the same debris the washer expels. If multiple drains in your laundry area are slow, the problem is downstream in your home's plumbing, not the washer itself.
4. Drain hose inserted too far into standpipe (approximately 8% of cases)
LG specifies that the drain hose should be inserted 6 to 8 inches into the standpipe, no more. If pushed too deep, it can create an airtight seal that produces siphoning or prevents proper drainage. The standpipe itself must also be at least 30 inches tall to prevent backflow.
5. Faulty drain pump motor (approximately 7% of cases)
The drain pump motor (a small impeller pump typically powered by a DC brushless motor) can fail due to worn bearings, a burned-out winding, or a cracked impeller. A failing pump often gives audible warning signs first: grinding, rattling, or humming without actually pumping water. The common LG drain pump assembly part number is 4681EA2001T, compatible across most LG front-load models.
6. Excessive suds blocking drainage (approximately 3% of cases)
Using non-HE detergent or too much detergent in a high-efficiency LG washer creates excessive foam that can overwhelm the drain system. The thick suds layer prevents water from reaching the pump intake efficiently. You may see a "Sud" code before or alongside OE in this scenario.
How to Fix the LG Washer OE Error — Step by Step
Work through these steps in order, from simplest to most complex. Most users resolve the OE error within the first two steps without needing any tools beyond a towel and a shallow container.
Step 1: Emergency drain and filter cleaning
This single step resolves approximately half of all OE errors. Every LG front-load washer has a drain pump filter accessible from the outside:
- Locate the access panel — It's a small rectangular door at the bottom-left or bottom-right of the washer's front face. On most LG models, it opens by pressing a tab or using a coin to turn a latch.
- Prepare for water — Place towels on the floor and have a shallow baking pan, large bowl, or a small bucket ready. Water will flow out when you open the filter.
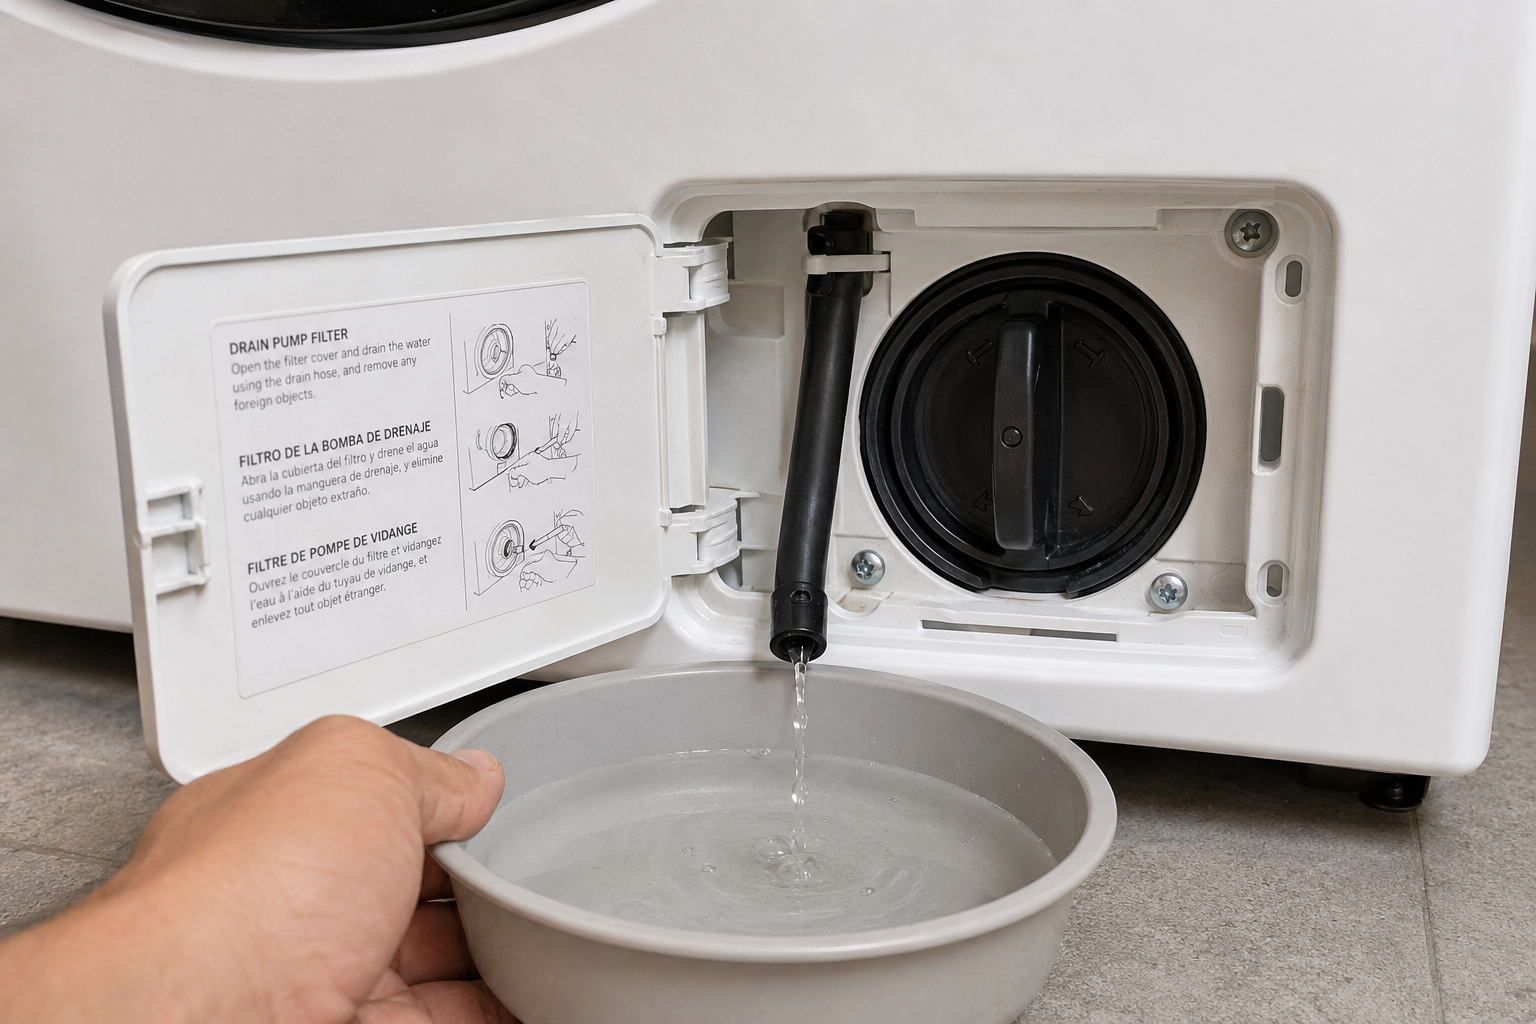
- Use the emergency drain hose first — Inside the access panel, you'll find a small black rubber hose (about the diameter of a pencil) with a cap on the end. Pull this hose out, point it into your container, and remove the cap. This slowly drains water from the tub without flooding. Let it drain completely — this may take 3–5 minutes for a full tub.
- Remove the drain pump filter — Once the water level drops, twist the large round filter cap counterclockwise and pull it out. Have a towel ready because some residual water will spill.
- Clean the filter — Remove any coins, hair, lint, or debris trapped in the filter screen. Rinse the filter under running water. Also look inside the filter housing cavity with a flashlight and remove anything stuck around the pump impeller.
- Inspect the impeller — You can see (and carefully feel) the pump impeller inside the cavity. Spin it gently with your finger. It should rotate freely. If it's jammed or cracked, the pump needs replacement (see Step 5).
- Reinstall the filter — Insert it back and twist clockwise until snug. Do not overtighten.
- Close the access panel and run a test cycle — Select Spin Only or Drain + Spin and see if the washer drains successfully.
Step 2: Inspect the drain hose
If the filter was clean or the error returns after cleaning:
- Pull the washer forward — Carefully slide the machine away from the wall to access the back.
- Check for kinks — The drain hose (large corrugated hose, usually gray) runs from the bottom-rear of the washer up to the standpipe or utility sink. Look for any sharp bends, crushing, or pinching. Straighten any kinks you find.
- Check hose insertion depth — The hose should be inserted 6 to 8 inches into the standpipe. If it's pushed all the way in, pull it back so only 6–8 inches are inside. The connection must NOT be airtight — air needs to flow around the hose for proper drainage.
- Disconnect and flush the hose — If you suspect internal buildup, disconnect the hose from both the washer and the standpipe. Run water through it in a sink to check for blockages. Use a bottle brush or run high-pressure water to clear any soap scum deposits.
Step 3: Check the standpipe and home plumbing
If the washer's internal components are clear but OE persists:
- Test the standpipe — Pour a gallon of water directly into the standpipe (without the washer hose). If it drains slowly or backs up, the problem is in your home's plumbing, not the washer.
- Snake the drain — Use a drain snake ($15–$30) to clear any blockage in the standpipe or the connecting pipe. Hair, lint, and soap buildup are common culprits.
- Check the standpipe height — The standpipe must be at least 30 inches tall and no more than 96 inches above the floor. If too short, backflow occurs. If too tall, the pump cannot push water high enough.
Step 4: Address suds issues (if applicable)
If you see excessive foam in the drum or a "Sud" code appeared before OE:
- Run a Rinse + Spin cycle with no detergent to flush the foam.
- Switch to HE detergent — All LG front-load washers require High Efficiency (HE) detergent. Regular detergent creates far too much foam.
- Reduce the amount — Even with HE detergent, most people use 2–3x more than needed. LG recommends 2 tablespoons of liquid HE detergent for a full load. Use less for soft water areas.
Step 5: Test and replace the drain pump
If all drain path checks pass but the washer still will not drain, the drain pump motor is likely faulty:
- Listen to the pump — During a drain cycle, put your ear near the bottom-front of the washer. A healthy pump hums smoothly. A failing pump makes grinding, rattling, or clicking sounds — or no sound at all (dead motor).
- Access the pump — Unplug the washer. Lay the machine on its back (protect the floor). The drain pump is accessible from the bottom of the machine, attached to the sump with 2–3 screws and an electrical connector.
- Test electrically — Disconnect the wiring harness. Using a multimeter set to ohms, test across the pump motor terminals. A healthy LG drain pump reads between 5 and 15 ohms. An open circuit (OL) means the motor coil is burned out.
- Replace if defective — The most common LG drain pump assembly part number is 4681EA2001T (compatible with WM3900, WM4000, WM4500, WM3700 series, and most LG front-load models from 2015 onward). Priced between $30–$70 from appliance parts retailers. Installation requires disconnecting 2–3 screws and one wiring harness — a 20-minute job.
Step 6: Reset the washer
After any repair, clear the error code:
- Press the Power button to turn off the washer.
- Unplug the machine from the wall outlet (or turn off the breaker) for 60 seconds.
- Plug it back in and power on.
- Run a Drain + Spin or Rinse + Spin cycle to confirm the error is gone.
When to Call a Professional
Contact a certified appliance repair technician if:
- You've completed all five diagnostic steps and the OE error still appears after a reset.
- The drain pump tests normal electrically (5–15 ohms) but still does not pump — this may indicate a control board communication failure.
- You hear water leaking inside the machine cabinet during drain cycles (possible internal hose detachment).
- The washer is still under LG's manufacturer warranty — LG provides 2 years parts and labor on the entire unit, and 10 years on the direct drive motor (though the drain pump is covered under the 2-year general warranty).
- You are not comfortable tilting the machine or disconnecting electrical components.
Average professional repair cost for an OE error: $150–$350 total (diagnosis + parts + labor). Typical diagnostic fee: $75–$100, usually credited toward the repair if you proceed with the same technician. Drain pump replacement labor: approximately 30–45 minutes.
For LG warranty service in the United States, contact LG directly at 1-800-243-0000 or submit a service request online at lg.com/us/support. LG uses authorized service networks — ask for an LG-authorized technician specifically, as they have access to OEM parts and warranty claim processing.
LG Washer Models Commonly Affected by OE Error
The OE error code appears across all LG washer lines — both front-load and top-load — because all models share the same fundamental drain pump filter design. However, these popular series see the highest volume of OE reports due to their market prevalence:
Front-Load Models:
- WM4000H series (WM4000HBA, WM4000HWA) — Wirecutter's top washer pick since 2022. 4.5 cu. ft. with TurboWash360.
- WM3900H series (WM3900HBA, WM3900HWA) — Popular mid-range with TurboWash360. 4.5 cu. ft.
- WM4500H series (WM4500HBA) — Mega capacity 5.0 cu. ft. front-loader.
- WM3700H series (WM3700HWA) — Entry-level Smart Wi-Fi front-load.
- WM2500CW — Compact 24-inch front-loader for small spaces.
Top-Load Models:
- WT7300C series (WT7300CV, WT7300CW) — 5.0 cu. ft. top-load with TurboWash3D.
- WT7900H series (WT7900HBA) — 5.5 cu. ft. mega capacity top-load.
The diagnostic and repair steps in this guide apply to all LG washer models displaying OE, E03, or E21. The only variation is the exact drain pump part number — though 4681EA2001T is compatible with the majority of front-load models. For top-loaders, check your model's parts diagram on LG's parts website or use the serial number tag inside the door frame.
Preventing Future OE Errors
Once you've resolved the immediate drainage issue, establish these maintenance habits to prevent recurrence:
- Clean the drain pump filter monthly. LG recommends monthly cleaning in their maintenance guide. Set a phone reminder. It takes 2 minutes once you know where it is and prevents the gradual buildup that triggers OE.
- Check pockets before every load. Coins, hair ties, paper clips, and small buttons are the most common filter-clogging items. A mesh laundry bag for small items also helps.
- Use the correct amount of HE detergent. Excess detergent creates residue buildup in the drain system. LG recommends 2 tablespoons of liquid HE detergent for a full load. Use the measuring cap — most people significantly over-pour.
- Run a monthly Tub Clean cycle. LG washers have a dedicated Tub Clean cycle (no clothes, hot water) that flushes residue from the drain system and tub. Use a washing machine cleaner tablet or plain bleach (one cup).
- Keep the drain hose routing smooth. After any maintenance where you move the washer, check that the drain hose behind the machine has gentle curves with no kinks or sharp bends.
- Verify standpipe clearance annually. Run a quick flow test (pour water directly in) to ensure your home's standpipe drain remains clear. Hair and lint buildup in the plumbing is gradual and invisible until it causes a backup.
Maintenance frequency that prevents 90%+ of OE errors: drain pump filter cleaning once per month, Tub Clean cycle once per month, drain hose inspection every 6 months.